
What Is Cluster Autoscaler?
Cluster Autoscaler is a Kubernetes feature that automatically adjusts the number of worker nodes in a cluster based on workload demands. It helps ensure that there are enough nodes to handle the current load, while also scaling down nodes when they are no longer needed. The Cluster Autoscaler monitors the utilization of resources, such as CPU and memory, and adjusts the size of the cluster by adding or removing nodes as necessary.
This feature helps optimize resource utilization and reduces the costs associated with overprovisioning of resources. The Cluster Autoscaler works in conjunction with the Kubernetes scheduler and can be configured to scale up or down based on various conditions, such as CPU and memory usage or the number of pending pods.
Cluster Autoscaler can also integrate with other Kubernetes features, such as Horizontal Pod Autoscaler (HPA) or Vertical Pod Autoscaler (VPA).
This is part of a series of articles about Kubernetes performance.
In this article:
- How Kubernetes Cluster Autoscaler Works
- Cluster Autoscaler Benefits and Limitations
- 8 Cluster Autoscaler Best Practices
How Kubernetes Cluster Autoscaler Works
Cluster Autoscaler works by monitoring the resource utilization of nodes in a Kubernetes cluster and automatically adjusting the number of nodes to match the current workload demands. When the Autoscaler determines that the current cluster resources are not sufficient to meet the workload demands, it triggers a scaling event to increase the cluster’s capacity.
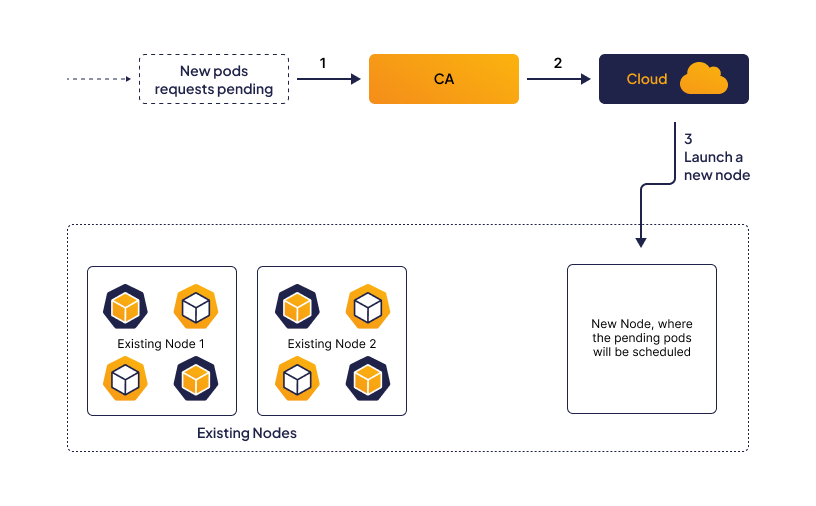
Suppose there is a Kubernetes cluster running a set of applications, and the current resource utilization of the nodes is near the limit. Additionally, there are pending pods that are waiting for resources to become available before they can be scheduled. In this scenario, the Cluster Autoscaler will check for pending pods and the current resource utilization of nodes.

The Autoscaler will then launch a new node based on the cluster’s configured constraints. For example, it may launch a node with a specific CPU or memory configuration. After the new node is launched, it is registered with the Kubernetes control plane, allowing the Kubernetes scheduler to assign pods to it.
The Autoscaler will then reallocate the pending pods to the newly launched node, providing additional resources for the workload. The Kubernetes scheduler will then assign pods to the new node based on the node’s available resources and the pod’s resource requirements.
Once the new node is fully operational and has been assigned pods, the Autoscaler will continue to monitor the cluster’s resource utilization and adjust the cluster’s capacity as necessary. If the resource utilization decreases, and there are nodes that are no longer needed, the Autoscaler will automatically scale down the cluster to reduce resource consumption and costs.
Learn more in our detailed guide to Kubernetes autoscaling
Cluster Autoscaler Benefits and Limitations
Cluster Autoscaler provides several benefits, including:
- Automatic scaling: Cluster Autoscaler automatically scales up or down the cluster based on the workload and demand, which helps to optimize resource utilization and ensure high availability of the applications.
- Cost-effectiveness: By automatically scaling the cluster based on demand, Cluster Autoscaler helps to reduce the cost of running and managing the cluster. It ensures that the cluster is not over-provisioned, which can lead to unnecessary costs.
- Improved performance: With the Cluster Autoscaler, applications can handle traffic spikes and surges without any downtime or performance issues. The Autoscaler ensures that there are enough resources to handle the workload.
- Ease of use: The Cluster Autoscaler is easy to use and configure. It integrates seamlessly with Kubernetes and cloud provider APIs.
There are also several limitations administrators should be aware of:
- Lack of on-premise support: Cluster Autoscaler is designed to work with cloud-based Kubernetes clusters, and there is limited support for on-premise deployments. This may limit its use in certain scenarios.
- Scaling can take time: The process of scaling up or down a cluster can take several minutes, depending on the size and complexity of the cluster. This may cause delays in responding to sudden changes in workload demands.
- Worker nodes with dependencies: If worker nodes have other dependencies or services running on them, the Cluster Autoscaler cannot remove them, even if they are not being utilized by the workload.
- Request-based scaling: The Autoscaler scales the cluster based on the resource requests of the pods running on it, rather than their actual usage. This can result in overprovisioning or underutilization of resources.
- Administrator action still required: The Autoscaler requires administrators to define the right size for new nodes, based on the workload requirements. If the new node size is too small or too large, it may not effectively optimize resource utilization.
8 Cluster Autoscaler Best Practices
Here are some Cluster Autoscaler best practices to consider:
- Configure resource limits: Ensure that resource limits are set for each pod in the cluster. This will help the Cluster Autoscaler to determine when additional nodes are required to meet demand.
- Set node taints and tolerations: Node taints and tolerations can help to ensure that pods are scheduled on nodes that have the required resources. By configuring node taints and tolerations, you can ensure that the Cluster Autoscaler only adds nodes that can handle the workload.
- Monitor the cluster regularly: Regular monitoring of the cluster is essential to ensure that the Autoscaler is functioning properly. Monitor the resource utilization of the nodes and the number of pending pods waiting to be scheduled. This will help to identify any issues that may affect the Autoscaler’s ability to scale the cluster.
- Consider auto-scaling policies: It is important to consider auto-scaling policies when using the Cluster Autoscaler. Set thresholds for CPU and memory usage that trigger the Autoscaler to scale up or down the cluster. This will help to ensure that the Autoscaler responds quickly to changes in demand.
- Optimize node sizes: Optimize the size of the nodes in the cluster to ensure that they are cost-effective and can handle the workload. Choose the right instance type and size based on the application’s resource requirements.
- Use multiple availability zones: Use multiple availability zones to ensure high availability of the applications. This will help to ensure that the cluster can handle failures in one availability zone without affecting the overall performance of the applications.
- Plan for node termination: When nodes are terminated, ensure that the pods running on them are rescheduled on other nodes in the cluster. This will help to ensure that there is no downtime or impact on the availability of the applications.
- Test the Autoscaler: Test the Autoscaler regularly to ensure that it is functioning properly. Create load tests and simulate sudden spikes in demand to test the Autoscaler’s ability to scale the cluster.
Related content: Read our guide to cluster autoscaler