

What is Autoscaling?
Autoscaling is the process of dynamically allocating resources to meet performance requirements. As workloads experience more demand, applications require additional resources to maintain performance levels and meet service level agreements (SLAs). Conversely, in periods of lower demand, these resources should be reallocated to conserve costs.
In a cloud environment, autoscaling can be performed in an elastic manner—meaning resources can be scaled up and down easily and with almost no limits. Cloud-based autoscaling eliminates the need for operators to constantly monitor system performance and make decisions about adding or removing resources.
There are two main ways to extend an application. Vertical scaling refers to changing the capacity of a specific resource, for example moving a workload to another compute instance with more CPU power and memory. Horizontal scaling refers to adding more instances, or removing instances, of resources used by a workload. For example, extending an application from one compute instance to five compute instances.
The Microsoft Azure cloud supports automatic horizontal scaling for compute instances, called virtual machines (VMs). Some Azure services can also perform vertical scaling.
This is part of a series of articles about cloud optimization.
In this article:
- How Does Azure Autoscale Work?
- Azure Autoscaling Tutorial: Create Your First Autoscale Setting
- Best Practices for Azure Autoscaling
How Does Azure Autoscale Work?
The following diagram describes Microsoft Azure’s autoscaling architecture.
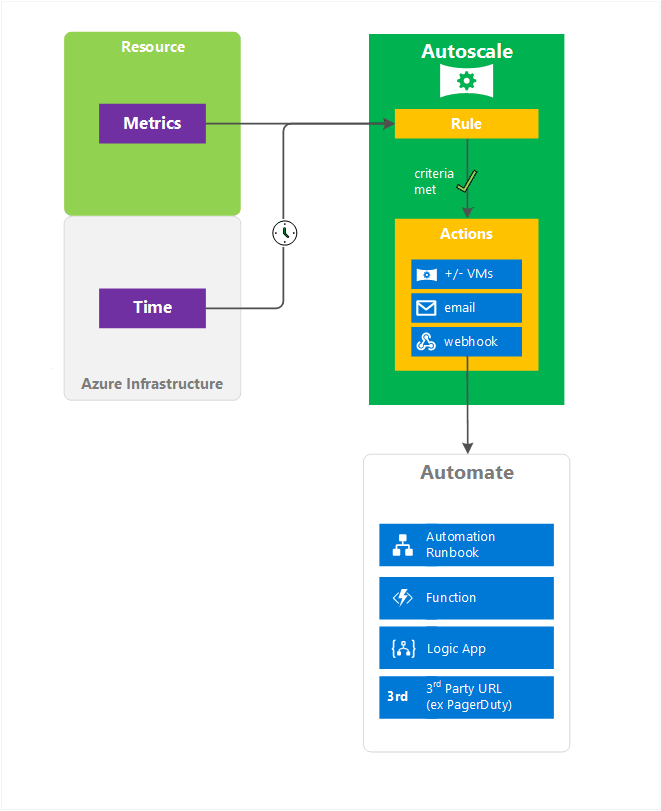
Resource and Custom Metrics
Azure resources generate metrics, which can be used to trigger scaling events. Azure uses the concept of a virtual machine scale set (VMSS), which scales up and down using telemetry data delivered directly from Azure infrastructure by Azure diagnostic agents. Common metrics include CPU utilization, memory utilization, number of threads, queue length, and disk utilization.
You can also use custom metrics generated by your own applications. This is done by configuring an application to send metrics to Azure Application Insights. Those metrics then become available to a VMSS and can be used to determine when to scale.
Time and Rules
Azure lets you set up schedule-based rules (also called time-based rules) that trigger a scaling event. Use schedule-based rules when your load has a fixed traffic pattern and you want to scale before known load changes occur.
You can also define metric-based rules that specify under which conditions a scaling event should occur, whether to scale up or down, and by how much to scale.
When there are multiple rules, Azure autoscaling works as follows:
- Scale up events are performed if any of rules are met
- Scale down events are only performed if all of the rules are met
- You can use the OR operator to scale out with multiple rules, and the AND operator to scale in with multiple rules.

Predictive Autoscaling
Predictive autoscaling uses machine learning to manage and scale Azure VMSS based on historical workload patterns. It estimates the overall CPU load of a VMSS based on CPU usage patterns, learning from past usage to predict the CPU load that will be required in the future. It can then scale up the resource to meet expected demand.
Predictive autoscaling follows the scaling boundaries you set for your VMSS. For example, if you set a limit for scaling out, predictive autoscaling will not create more VMs than this limit. You can also configure a time to provision new instances in advance, up to 60 minutes before the expected peak workload.
You can view the expected CPU utilization of the predictive autoscaling model without actually triggering a scaling action. This lets you gain confidence in your predictive model by comparing your forecasts to real-world workload patterns. If predictions are accurate, you can turn on predictive autoscaling.
Predictive autoscaling requires a minimum of 7 days of historical data, and is most accurate when there is at least 15 days of historical data.
Related content: Read our guide to Azure optimization (coming soon)
Azure Autoscaling Tutorial: Create Your First Autoscale Setting
This step-by-step tutorial guides you through the process of creating your first autoscale setting.
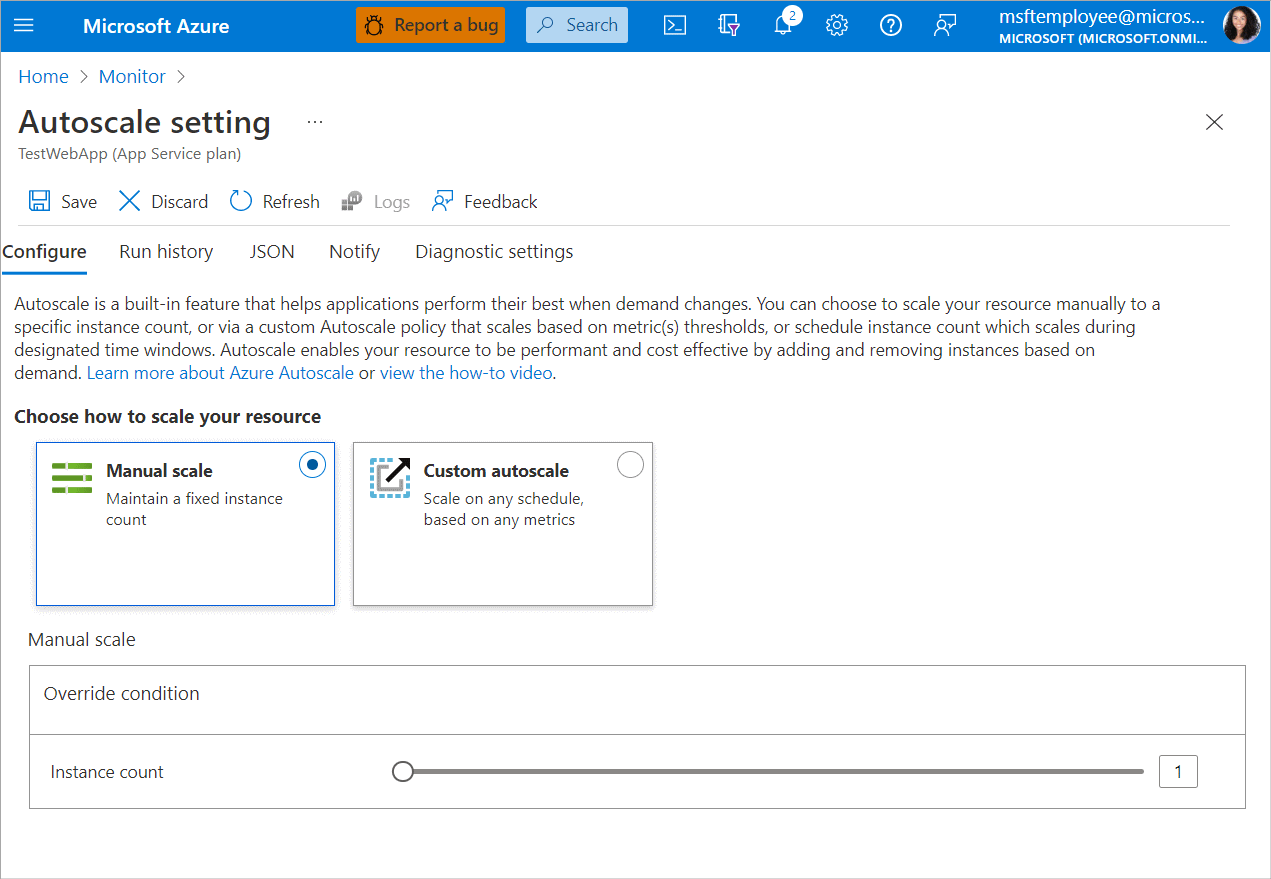
- Go to Azure Monitor, open the Autoscale pane, and choose a resource to scale.
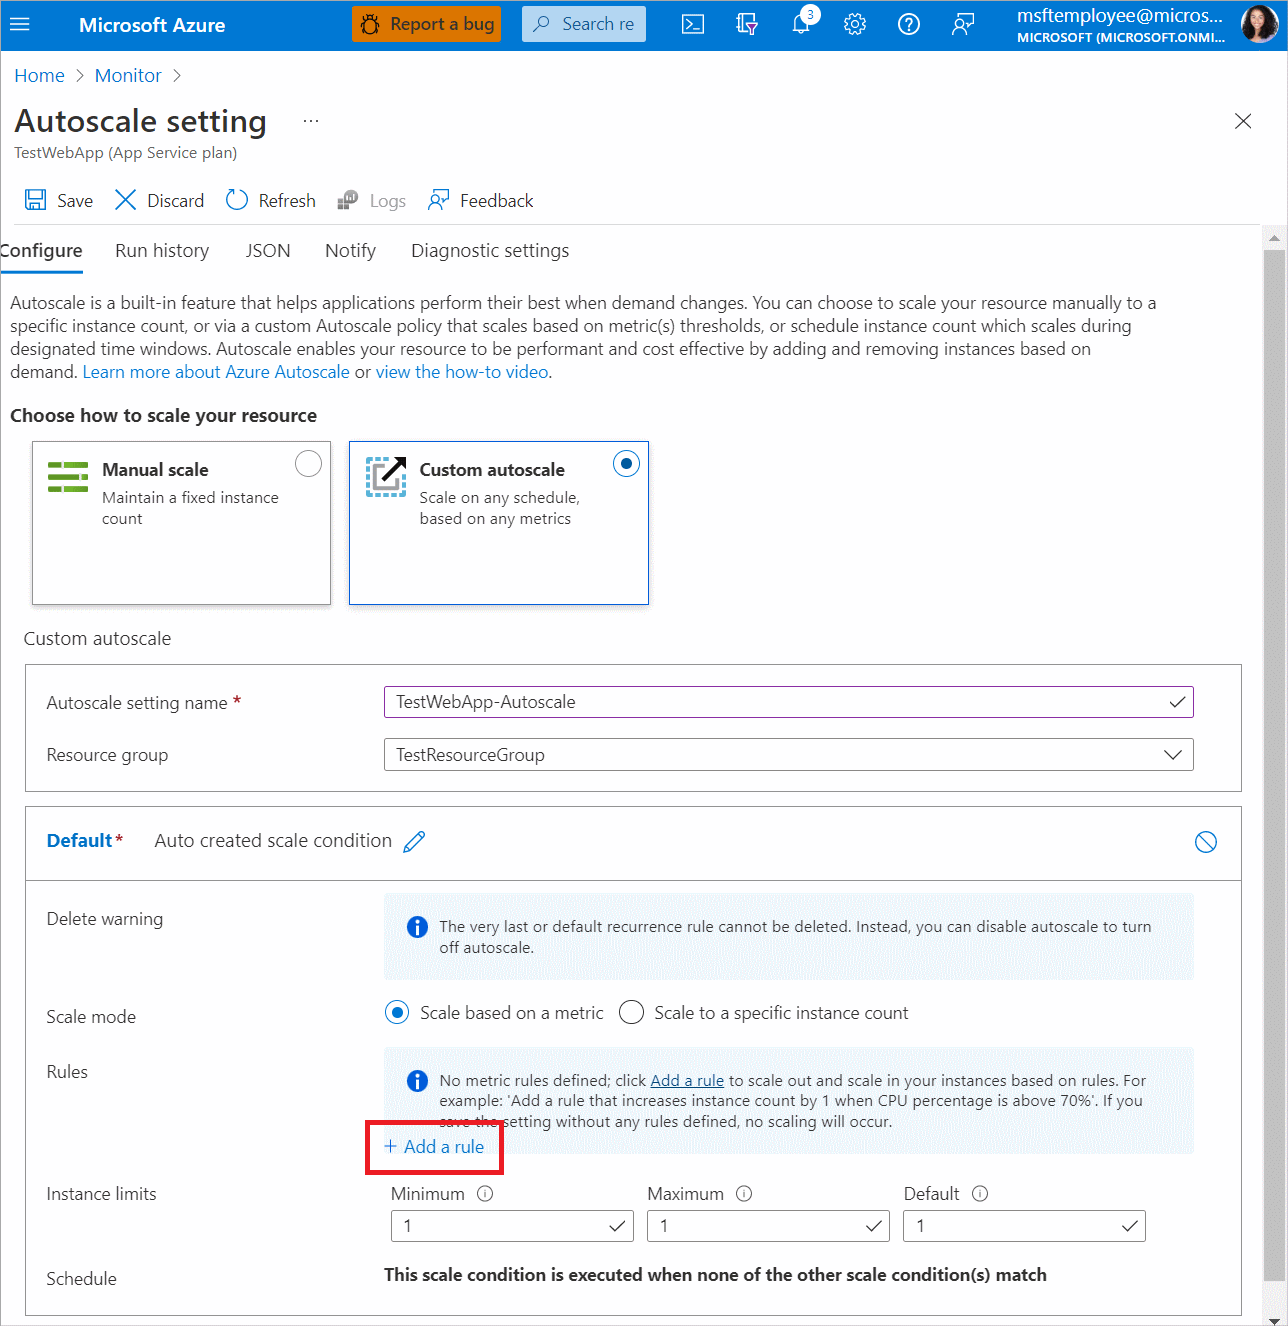
- The instance count is set to 1. To change this, select Custom autoscale.
- Enter a name for your scale setting. Choose the Add a rule option to open a context pane on the right side. This action sets the instance scaling count by 1 when the resource’s CPU percentage exceeds 70%, by default. Keep this setting at the default value and then choose Add.
- You have created your first scale rule. At the end of this process, the UX recommends having at least one scale in rule. You can set this up by choosing the Add a rule option, setting Operator to Less than, Threshold to 20, and Operation to Decrease count by. You should now have a scale setting that scales in and out according to CPU usage.
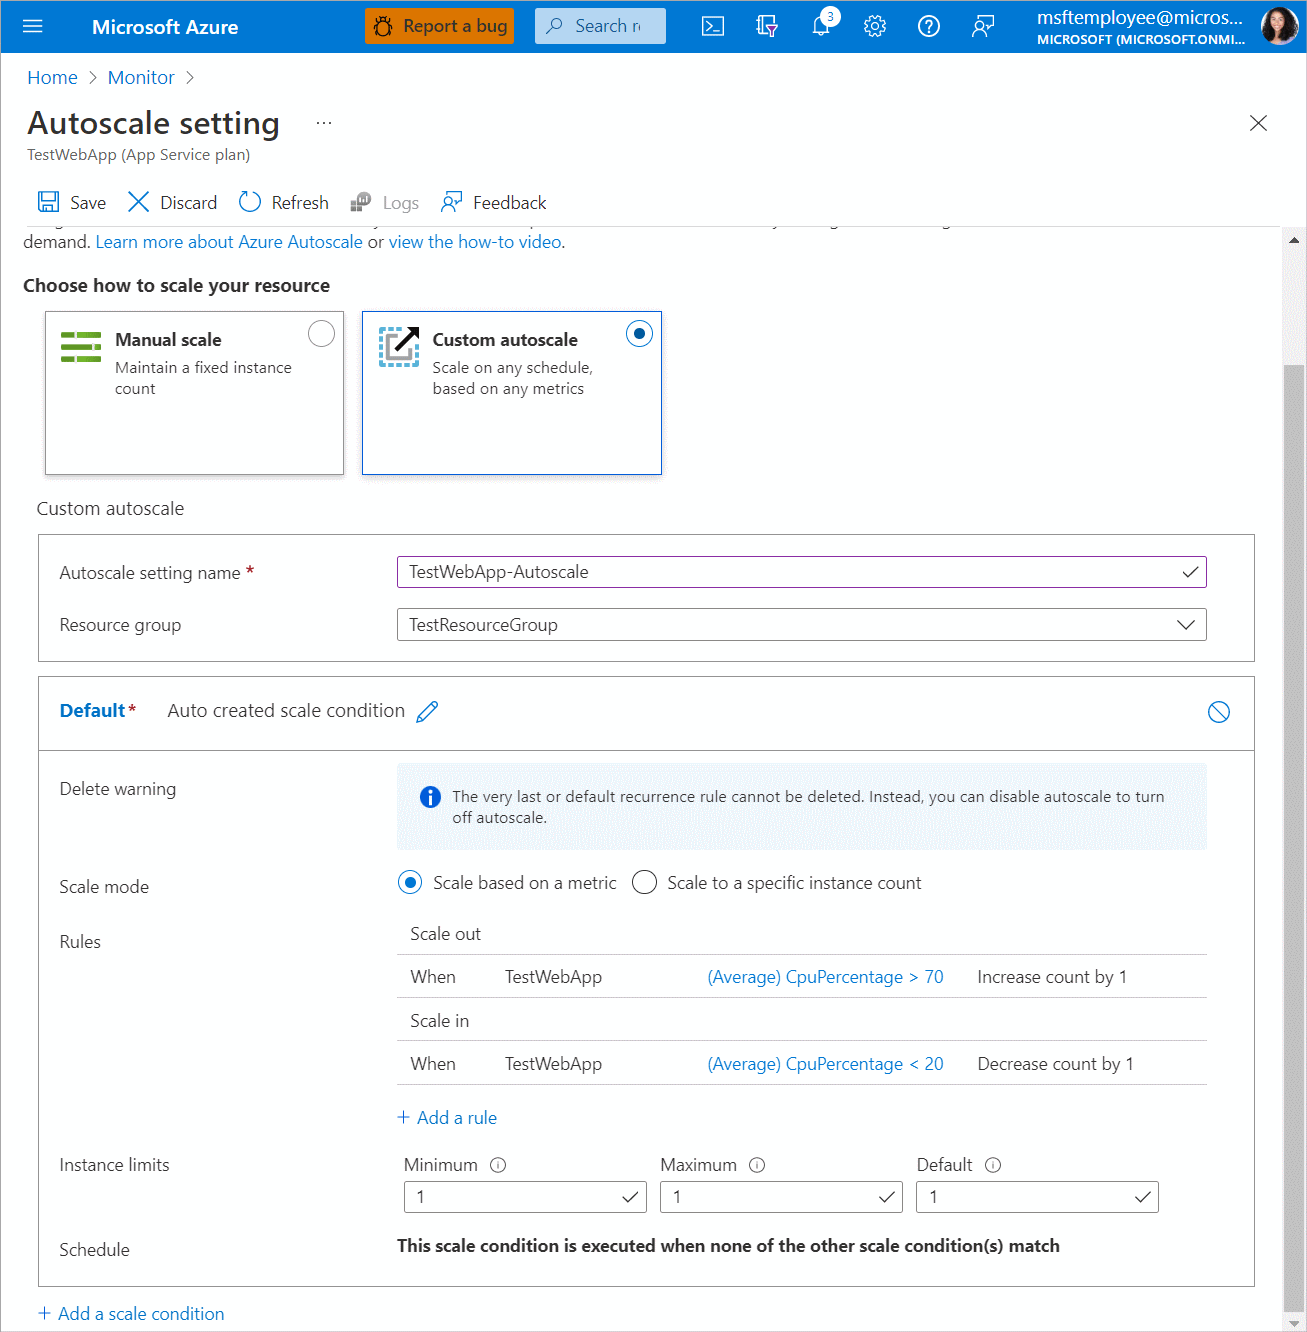
- Choose Save.
You have now finished creating your first scale setting to autoscale a web application according to CPU usage.
Best Practices for Azure Autoscaling
Use the following best practices when using autoscaling:
Working with Maximum and Minimum Values
The minimum and maximum values must be different, otherwise scaling won’t occur. For example, if min=2 and max=6, the VMSS can scale to 6s VMs. But if both are set to 2, scaling will never occur. It is important to leave a margin between the minimum and maximum values, to give the autoscaling algorithm room to scale workloads up and down.
Note that if you manually update the number of instances to a value above the maximum value or below the minimum, on the next run, the autoscale engine will adjust the scale of the VMSS to the manually chosen maximum (if you set a manual value above maximum) or minimum (if you set a maximal value above the minimum).
Working with Rule Combinations
When using only one part of a combination, autoscale takes action in a single direction to scale in or out until it reaches the minimum or maximum instance count defined in the profile. The goal is to ensure your resource scales up during high usage periods to maintain availability and scale down during low usage periods to realize cost savings.
You should use the same metrics to control your scale-in and scale-out rules. Otherwise, your scale-in and scale-out conditions might not be met simultaneously, resulting in “flapping” – a loop of scale in and scale out events.
Considerations for Scaling When Multiple Profiles Are Configured in an Autoscale Setting
When creating your autoscale setting, you can use one of the following options:
- A default profile applied without dependency on time or schedule
- A recurring profile or a profile for a fixed period, including a date and time range.
Once the autoscale service processes these profiles, it checks in the following order:
- Fixed Date profile
- Recurring profile
- Default (Always) profile
If a certain profile condition is met, the autoscale feature does not check the following profile condition, processing one profile at a time. You must add these rules to the current profile if you want to include a processing condition from a lower-tier profile.