
What Is Azure Cost Management?
Azure Cost Management + Billing is a set of tools from Microsoft that help you analyze, manage, and optimize cloud workload costs.
When you create and use Azure resources, you are charged for only the resources your workloads actually use. New resources are easy to deploy and can add significant cost to your workloads, unless they are properly monitored.

You can use the Cost Management and Billing experience to pay bills, manage access to billing and cost operations, download cost and usage data for monthly billing, proactively apply data analytics to cloud costs, set hard spending limits, and identify opportunities for cost optimization to to workload fluctuations.
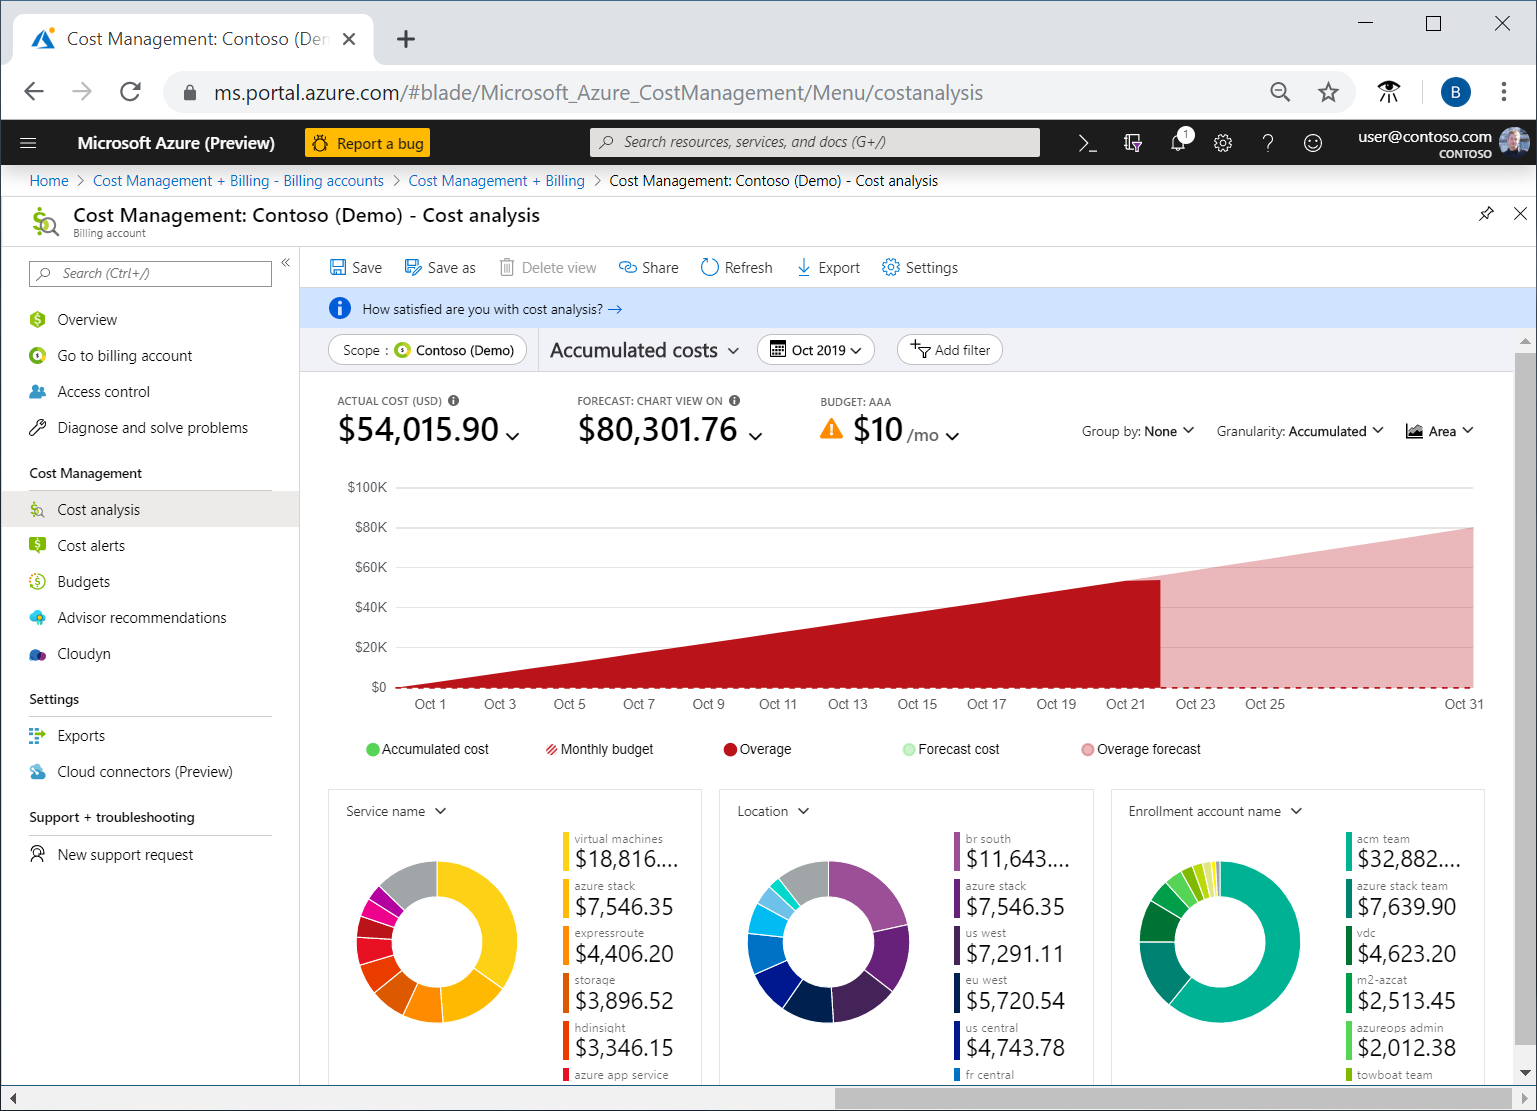
Image Source: Azure
In this article:
- Benefits of Microsoft Azure Cost Management
- 4 Azure Cost Management Tools
- Azure Cost Management Best Practices
Benefits of Microsoft Azure Cost Management
Cost Visibility and Transparency
Azure Cost Management lets you see exactly how much you’re spending on each Azure service, and you can drill down into the details to understand the factors driving your costs. This level of visibility makes it easier to identify cost-saving opportunities and take action to reduce your cloud expenses.
Furthermore, Azure cost management provides transparency not just for IT and finance teams, but for the entire organization. By sharing cost information with project managers, department heads, and other stakeholders, you can foster a culture of cost awareness and accountability.
Budgeting and Forecasting
With Azure Cost Management, you can set up budgets for your Azure services and track your spending against these budgets in real time. This allows you to manage your cloud costs proactively and avoid cost overruns.
Moreover, Azure cost management provides forecasting capabilities that can help you predict your future cloud costs. By analyzing your historical usage and cost data, it can generate accurate forecasts of your future spending. This can be invaluable for budget planning and for managing the financial risks associated with cloud usage.
Cost Optimization and Savings
Azure Cost Management can identify inefficiencies and waste in your Azure usage, helping you unlock significant cost savings. For example, Azure cost management can detect idle or underutilized resources. By shutting down these resources or resizing them to fit your actual needs, you can reduce your Azure costs without impacting your operations.
In addition, Azure Cost Management can help you take advantage of cost-saving pricing options offered by Azure, such as reserved instances and spot instances. By recommending these options when they are suitable for your workloads, it can help you save money without sacrificing performance or reliability.
Governance and Compliance
With Azure Cost Management, you can set up policies to limit spending on certain Azure services or to prevent the creation of resources that don’t meet your cost or performance requirements. These policies can be enforced automatically, reducing the risk of cost overruns and ensuring adherence to your cost management strategies.
Moreover, Azure cost management provides detailed cost reports that can support your compliance reporting needs. By documenting your Azure spending and demonstrating your cost management efforts, these reports can help you meet your regulatory and audit requirements.
4 Azure Cost Management Tools
1. Azure Cost Analysis

Source: Azure
Visibility into Azure spending is a top priority. The cost analysis from Azure Cost Management helps break down your Azure costs by filtering and grouping resources. It lets you see what services currently cost, helping you understand why the bill is higher than expected.
The cost analysis dashboard offers the following filters:
- Scope—view the costs for management groups, resource groups, or subscriptions.
- Time—filter spending by year, quarter, month, week, or day.
- Granularity—sort by accumulated, monthly, or daily costs (or none).
- Group—group information by resource group, type, or tags.
You can create custom filters or view costs by resource to identify the most expensive resources. The results are exportable to Excel and CSV (you can schedule regular file exports). Combined with recommendations from Azure Advisor, Azure Cost Analysis helps you cut down your Azure costs.

2. Azure Cost Alerts

Source: Azure
Azure Cost Management has three types of alerts:
- Budget alerts—notify you when your spending nears or exceeds the budgets defined in the Azure portal or via an Azure Consumption API. Azure sends email alerts to specific recipients.
- Credit alerts—notify you when you’ve consumed 90% and 100% of your Azure credits.
- Spending quota alerts—notify you when a department’s spending nears the threshold specified in the Enterprise Agreement portal. Azure sends email alerts to the department owner.
3. Exports
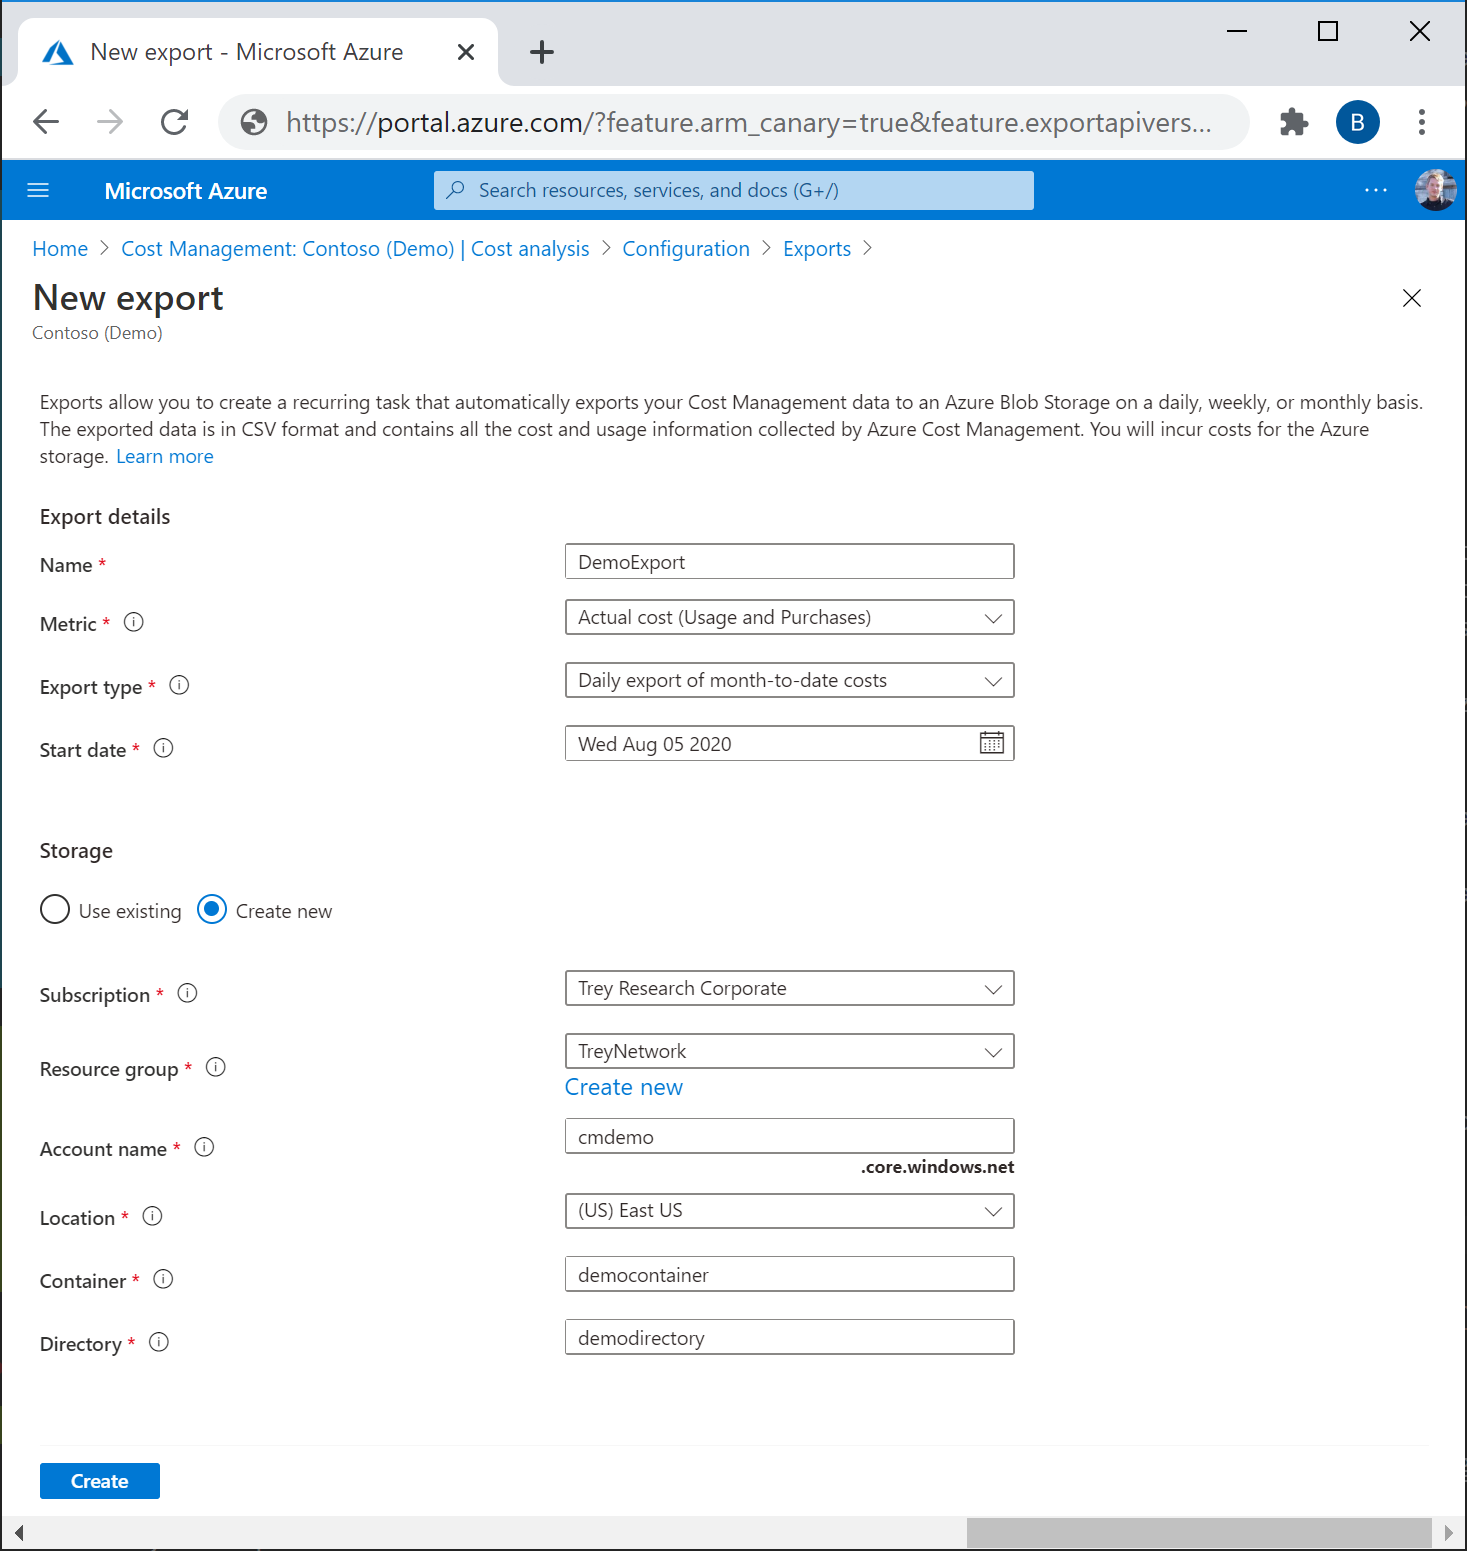
Source: Azure
Exports is another useful tool in the Azure Cost Management suite. It allows you to export your Azure cost and usage data for further analysis. This tool supports various export formats, including CSV, Excel, and JSON, making it easy to integrate with your existing data analysis tools.
With Exports, you can schedule regular exports of your cost data, ensuring you always have the latest information at your fingertips. You can also specify the level of detail you want in your export, from a high-level summary to a detailed breakdown of your costs by resource, resource group, and more.
Exports is particularly useful for organizations with complex cost management needs. For example, if you have multiple subscriptions or management groups, Exports allows you to consolidate all your cost data into a single view, making it easier to analyze and manage your overall cloud spending.
4. Cost Details API
The Cost Details API is a RESTful API that provides programmatic access to your Azure cost and usage data. With this API, you can retrieve your cost data in a machine-readable format, making it easy to integrate with your existing systems and applications.
The Cost Details API supports a variety of queries, allowing you to retrieve your cost data based on different criteria. For example, you can retrieve costs by resource, resource group, subscription, and more. You can also specify the time period for which you want to retrieve costs, giving you the flexibility to analyze your costs over different time frames.
One of the key benefits of the Cost Details API is its ability to support automation. By integrating the Cost Details API into your systems, you can automate your cost management processes, such as generating cost reports, alerting on cost overruns, and more. This not only saves you time and effort but also ensures you always have the most accurate and up-to-date cost information.
Learn more in our detailed guide to Azure cost management tools
4 Azure Cost Management Best Practices
1. Azure Onboarding Options
When starting to use Azure, you need to decide which Azure services are most appropriate for your use case. Also think about your future use of Azure, and which pricing models are most appropriate—on-demand payments, reserved instances, or spot instances.
Pricing models will also influence your cashflow—whether you pay for Azure services during the month, at the end of the month, or even once per year.
You can use budgets to measure the effectiveness of your initial estimate over time, and compare it to the actual cost of your deployed solution.
2. Tag Shared Resources
Tagging is an effective way to understand costs across teams and types of workloads. Shared resources can be placed in subscriptions belonging to specific departments, or in a special Azure subscription dedicated to shared resources. If resources used by one team are located in a subscription belonging to another team, it is possible to separate the costs using tags, and internally bill it to the other team.
Similarly, web applications or environments (such as test and production) may use resources from multiple Azure subscriptions owned by different teams. To better understand the overall cost of the workload, you can tag the resources it uses. When tags are applied correctly, they can be used as filters in cost analysis to better understand trends.
3. Using Cost Analysis
Azure Cost Analysis breaks down costs using multiple, standard resource properties. Filter costs and analyze them to perform the following activities:
- Estimate costs for this month—how much has been spent so far this month, and whether a resource is within the budget.
- Investigate anomalies—verifying that costs are kept within reasonable limits for normal use, considering historical trends.
- Reconcile bills—identifying why a recent bill is higher than previous months, and what caused the change in spend.
- Internal chargebacks—managing how to charge back costs to the relevant cost center in the organization.
4. Create Budgets
Once you have identified and analyzed your spending patterns, set limits for yourself and your team using the Azure Budgets feature. This lets you set cost- or usage-based budgets with multiple thresholds and alerts.
Periodically review the budgets you create to see budget usage and make changes as needed. Azure Budgets also allows you to configure automated triggers when certain budget thresholds are reached—these triggers can be used, for example, to automatically shut down VMs or move infrastructure to a different pricing tier.