
What Is Elasticsearch on Docker?
Elasticsearch is a distributed, open-source search and analytics engine designed for horizontal scalability, reliability, and easy management. It enhances the speed of search operations, offers real-time analytics, and handles a wide variety of data types.
Docker is a platform that automates the deployment, scaling, and management of applications using containerization. A Docker container is a standard unit of software that packages up code and all its dependencies so the application runs quickly and reliably from one computing environment to another.

“Elasticsearch on Docker” means running Elasticsearch service inside a Docker container. This approach combines the efficient search and analytics capabilities of Elasticsearch with the versatility and ease of use provided by Docker.
Running Elasticsearch on Docker allows developers to isolate Elasticsearch from other applications, control resource allocation, and simplify the process of deploying and managing Elasticsearch. This is particularly useful for creating predictable, reproducible environments that are easy to maintain and scale.
In this article:
- Benefits of Running Elasticsearch on Docker
- Getting Started with Elasticsearch on Docker
- Best Practices for Running Elasticsearch on Docker
Benefits of Running Elasticsearch on Docker
There are several compelling reasons to run Elasticsearch on Docker:
- Docker makes it easy to install and run Elasticsearch: By using Docker, you can have a fully functioning Elasticsearch service up and running in minutes, without having to worry about complex setup procedures or compatibility issues.
- Docker containers are lightweight and efficient: They do not require a full operating system and can share the host system’s resources, which means you can run multiple Elasticsearch instances on a single server. This allows you to make the most of your hardware and can reduce costs.
- Docker provides an isolated environment for your Elasticsearch service: This means your Elasticsearch service won’t interfere with other applications, and vice versa. This isolation also increases security as it limits the potential attack surface.
- Docker makes it easy to scale your Elasticsearch service: You can easily create new Docker containers to handle increased load, allowing you to meet your business needs as they evolve.
Getting Started with Elasticsearch on Docker
Step 1: Install Docker
Before we see how to run Elasticsearch on Docker, we need to ensure Docker is installed on your system. Docker is available for a variety of operating systems, including MacOS, Windows, and various distributions of Linux.
To install Docker, follow the official Docker documentation that corresponds to your operating system (see instructions for Windows and Linux). After successful installation, you can verify it by running the command docker –version in your terminal. This command should return the currently installed version of Docker.

Step 2: Run Elasticsearch on Docker for Development
Once Docker is up and running, the next stage is to run the Elasticsearch Docker image. Docker images are essentially snapshots of a Docker container. These images are used to create an instance of a Docker container by running the command docker run.
To get the Elasticsearch Docker image, we will use the command:
docker pull docker.elastic.co/elasticsearch/elasticsearch:7.8.07.8.0 is the version of Elasticsearch we want to pull. After successfully pulling the image, we can now run Elasticsearch on Docker using this command:
docker run -p 9200:9200 -p 9300:9300 -e
"discovery.type=single-node"
docker.elastic.co/elasticsearch/elasticsearch:7.8.0
A few things to note about this command:
- The -p option in the above command maps a network port on the Docker host to a port in the Docker container. In this case, ports 9200 and 9300 on the host are mapped to ports 9200 and 9300 on the Docker container, respectively.
- The -e option sets environment variables. Here, we’re setting the discovery.type environment variable to single-node, which means we’re running a single-node Elasticsearch cluster.
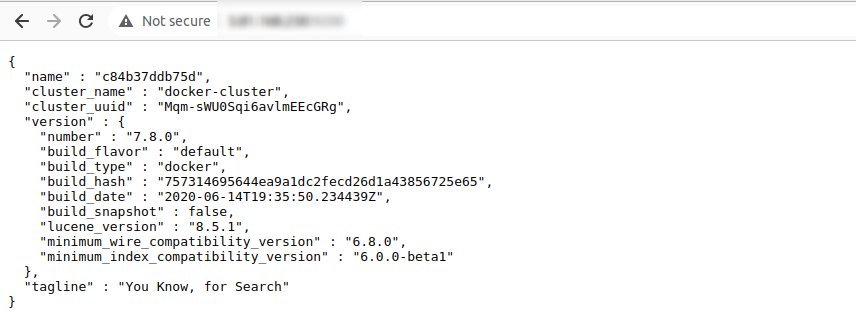
The output in the web browser will look something like this:
Step 3: Run Kibana on Docker for Development
Now that we have Elasticsearch running on Docker, we might want to visualize the data stored in Elasticsearch. This is where Kibana comes in. Kibana is an open-source data visualization and exploration tool used for log and time-series analytics, application monitoring, and operational intelligence use cases. It offers visualization capabilities on top of the content indexed in an Elasticsearch cluster.
To run Kibana on Docker, we first need to pull the Kibana Docker image using the command:
docker pull docker.elastic.co/kibana/kibana:7.8.0Now we can run Kibana on Docker using this command:
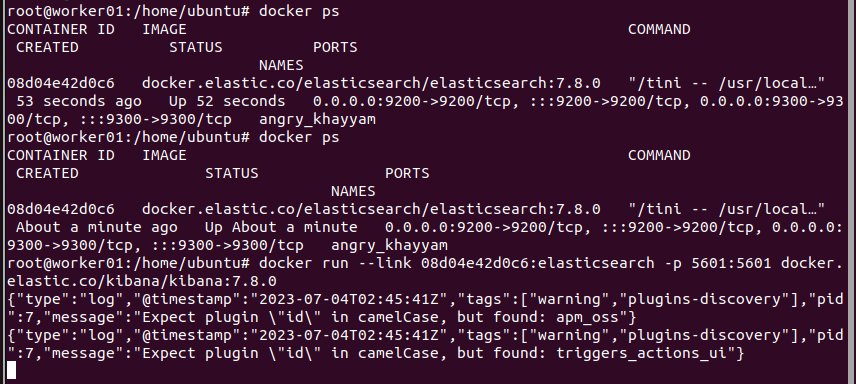
docker run --link
YOUR_ELASTICSEARCH_CONTAINER_NAME_OR_ID:elasticsearch -p
5601:5601 docker.elastic.co/kibana/kibana:7.8.0
Note: You can find YOUR_ELASTICSEARCH_CONTAINER_NAME_OR_ID using docker ps command as shown below:
A few things to note about this command:
- The –link option links your Kibana Docker container with your Elasticsearch Docker container.
- YOUR_ELASTICSEARCH_CONTAINER_NAME_OR_ID should be replaced with the name or id of your Elasticsearch Docker container.
- Port 5601 on the Docker host is mapped to port 5601 on the Kibana Docker container, where Kibana is accessible.
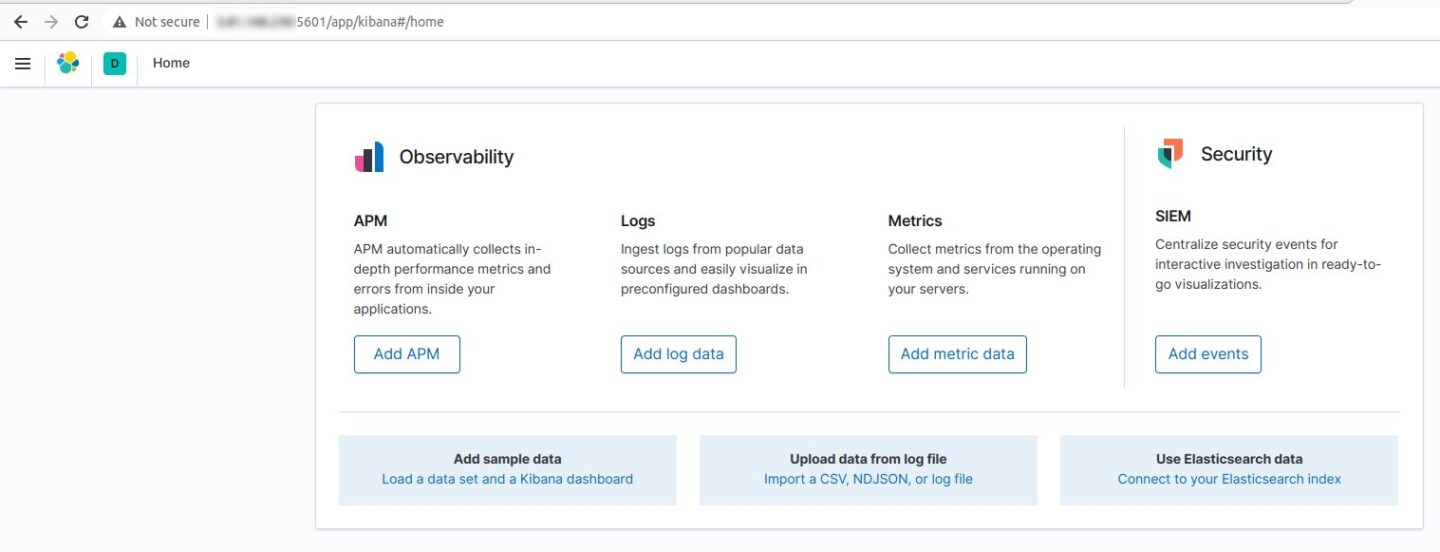
You can access Elasticsearch on your browser using the following URL:
http://:5601 If everything is working properly, you should see the Elasticsearch home screen:
That’s it! You can now use Elasticsearch and Kibana on your new Docker container.
Learn more in our detailed guide to Elasticsearch monitoring (coming soon)
Best Practices for Running Elasticsearch on Docker
Memory Settings
Elasticsearch uses a lot of memory, especially when dealing with large datasets. Therefore, it’s vital to allocate sufficient memory to the Docker container running Elasticsearch.
It’s recommended to allocate at least 50% of total RAM to Elasticsearch’s heap memory. However, the heap size should not exceed 32GB. Exceeding this limit may cause Elasticsearch to slow down due to Java’s usage of compressed object pointers. It’s also important to remember that Elasticsearch uses memory for more than just the heap. Therefore, the container must have more memory than the heap size.

Data Persistence
By default, Docker containers are ephemeral, meaning they lose all data when restarted. This is problematic for a data-intensive application like Elasticsearch.
To ensure data persistence, you should store your data in Docker volumes. Docker volumes are persistent storage areas that exist independently of containers. Even if you stop or remove your Elasticsearch container, your data remains safe in the Docker volume.
Clustering
Elasticsearch is designed to work in a cluster environment, where multiple nodes cooperate to distribute data and workload. This design is highly beneficial for scalability and redundancy. However, operating an Elasticsearch cluster on Docker can be challenging.
You need to ensure that all Elasticsearch nodes in the Docker network can communicate with each other. Docker has built-in networking capabilities that allow containers to communicate across different hosts. Also, use Elasticsearch’s discovery mechanisms to enable nodes to find each other and form a cluster.
Resource Limits
Docker allows you to set resource limits on containers. This feature is useful for ensuring that your Elasticsearch container does not consume all system resources and impact other applications.
You can set limits on CPU, memory, and disk I/O. For Elasticsearch, it’s essential to give the container enough resources to handle the workload effectively. However, be careful not to allocate all resources to Elasticsearch, as this can starve other applications.
Avoid ‘Docker exec’ for Routine Tasks
‘Docker exec’ is a command that allows you to run commands inside a Docker container. While it’s useful for debugging, it’s not recommended for routine tasks.
Running routine tasks with ‘Docker exec’ can lead to problems. For example, if you use ‘Docker exec’ to create data inside the container, this data will be lost when the container is restarted. Instead, use Docker’s built-in mechanisms for data persistence, such as Docker volumes.
Learn more in our detailed guide to:
Elasticsearch on docker
Elasticsearch on AWS
Elasticsearch tutorial
Elasticsearch Vs Mongodb